J-1 Scholar CUIMC Department Compass User Guide
This is a guide for Departmental Users at CUIMC on how to submit electronic requests to the case management system, Compass, for J-1 visa sponsorship of international scholars and student interns at Columbia University. The guide includes instructions for applications for an initial J-1 Scholar, an initial J-1 Student Intern and J-1 Scholar extension.
Please note: International visitors in J-1 status are referred to as J-1 Exchange Visitor.

Using Compass
- The University ID is not the UNI, it is an ID generated by Compass.
- Any scholar that you add to Compass will appear in the list of your "Current Cases." The list is in alphabetical order by last name.
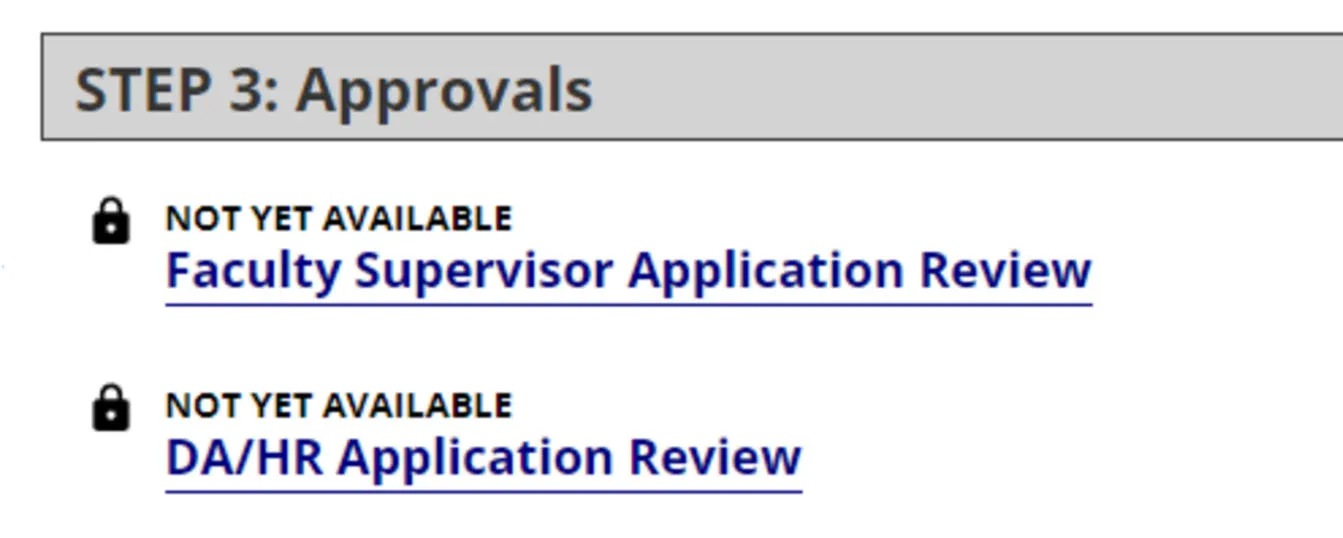
- You will see that some forms are not available for submission (locked). They will not become available for submission until all prior forms (including scholar’s forms) have been submitted.
- Once you send a request for approval to the Faculty Sponsor, do not change anything on the preceding forms because it will interfere with the processing of the application.
- The "View/Save/Print E-Form Group" link above the application allows you to generate a PDF of the complete application.

- Only the latest user who accessed the application will receive notifications about the application progress.
- Please do not use the “Save Defaults” button. This button is for large groups of people coming to Columbia. If you use this button, every subsequent application you submit will have the information from the application in which you used this button. This causes applications to be saved incorrectly and prevents successful submission. If you previously clicked that button and saved defaults, you can correct that by clearing all the fields in a form and clicking Save Defaults again. That will save empty fields as defaults for future applications.
- Please do not use the "Middle Name" field when adding a new person in Compass. Please use the individual’s passport to create a record. In the "Last Name" field please put the person’s last name exactly as it is in the passport. In the "First Name" field please put the person’s first name exactly as it is in the passport.
Some forms in the application require an approval from another party before they can be submitted. We use Second Approver functionality in these forms. Such forms will require the Departmental User to enter the Second Approver’s name and email address while filling out the form. Once the Departmental User submits the form, the Second Approver will get an email with a link to sign in and fill out the Second Approver section of the form. The email will look like this:

When the Second Approver clicks on the link they will be directed to the Compass sign-in page. The credentials to log in will be generated automatically. Once logged in, the Second Approver will see a page with links to the forms that have already been completed. To review the application the Second Approver must click on each completed form separately. Upon reviewing the information in the completed forms, the Second Approver can submit the approval.
Second Approver forms will be marked as "Submitted" only after the Second Approver reviews and approves the request.
While a form is pending a Second Approver approval, it will be marked as "Routed to Third Party."

How to Request Access to Compass
If this is the first time you are submitting an application through Compass, you will need to request access to Compass. Please follow the steps below to do so.
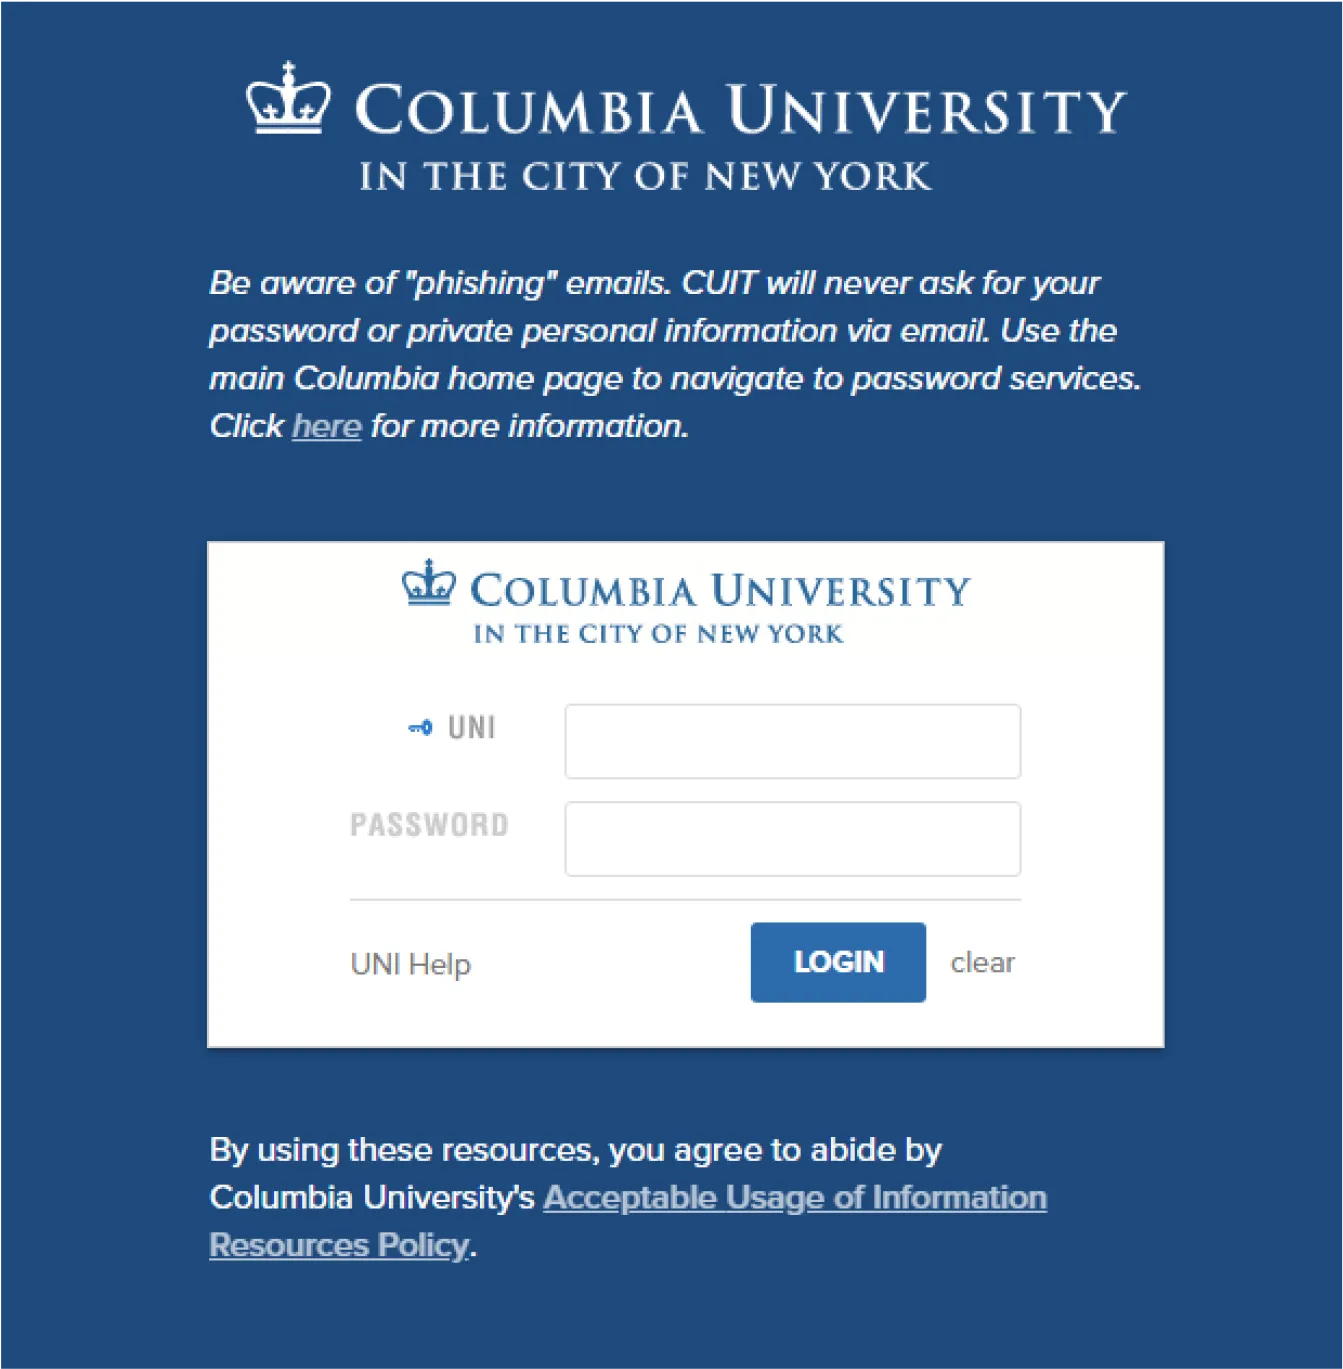
Navigate to the main login page by using this link.
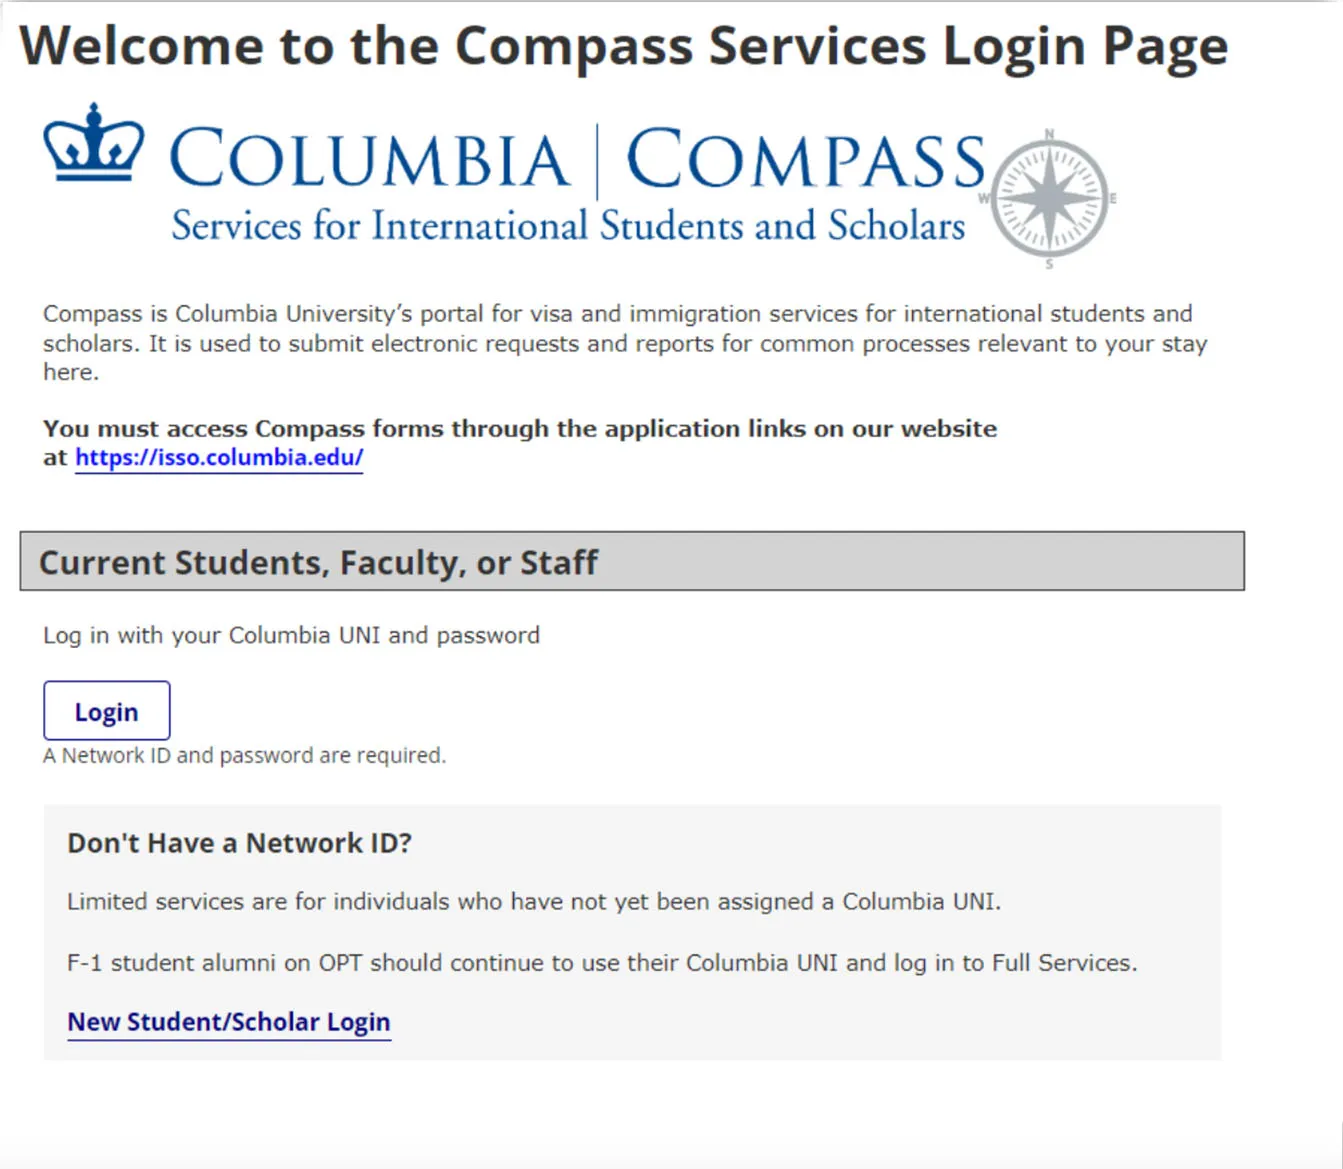
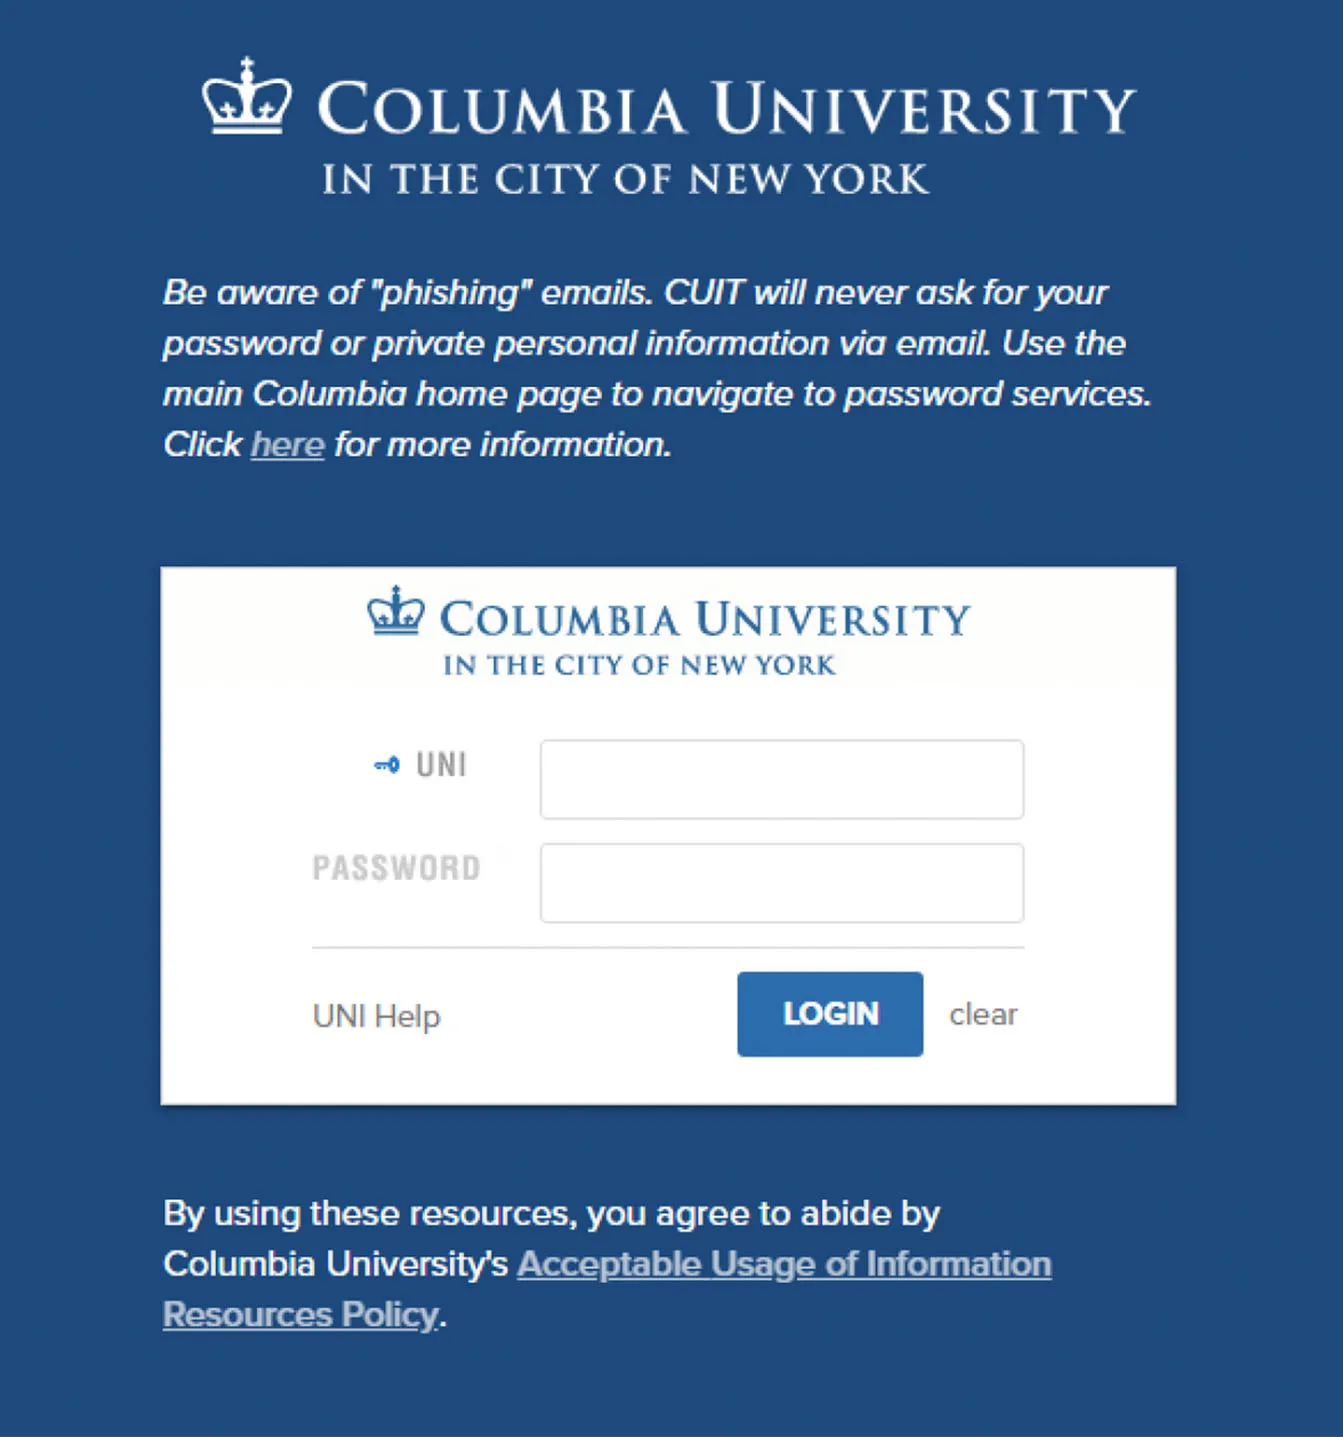
Click on “Login” and log in with your credentials. These are the same credentials that you use for logging in to other Columbia University systems.
Select “Department” and click on “Request Account.”
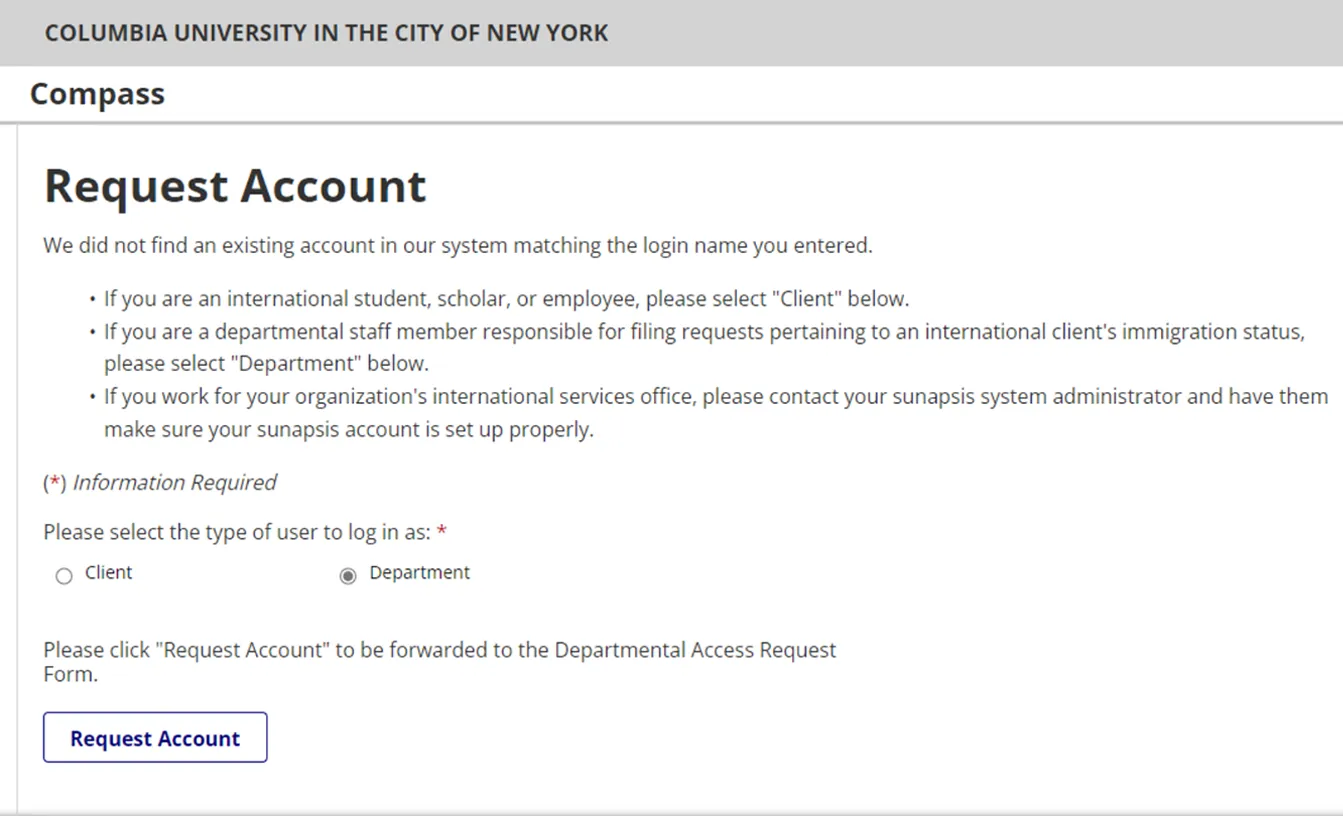
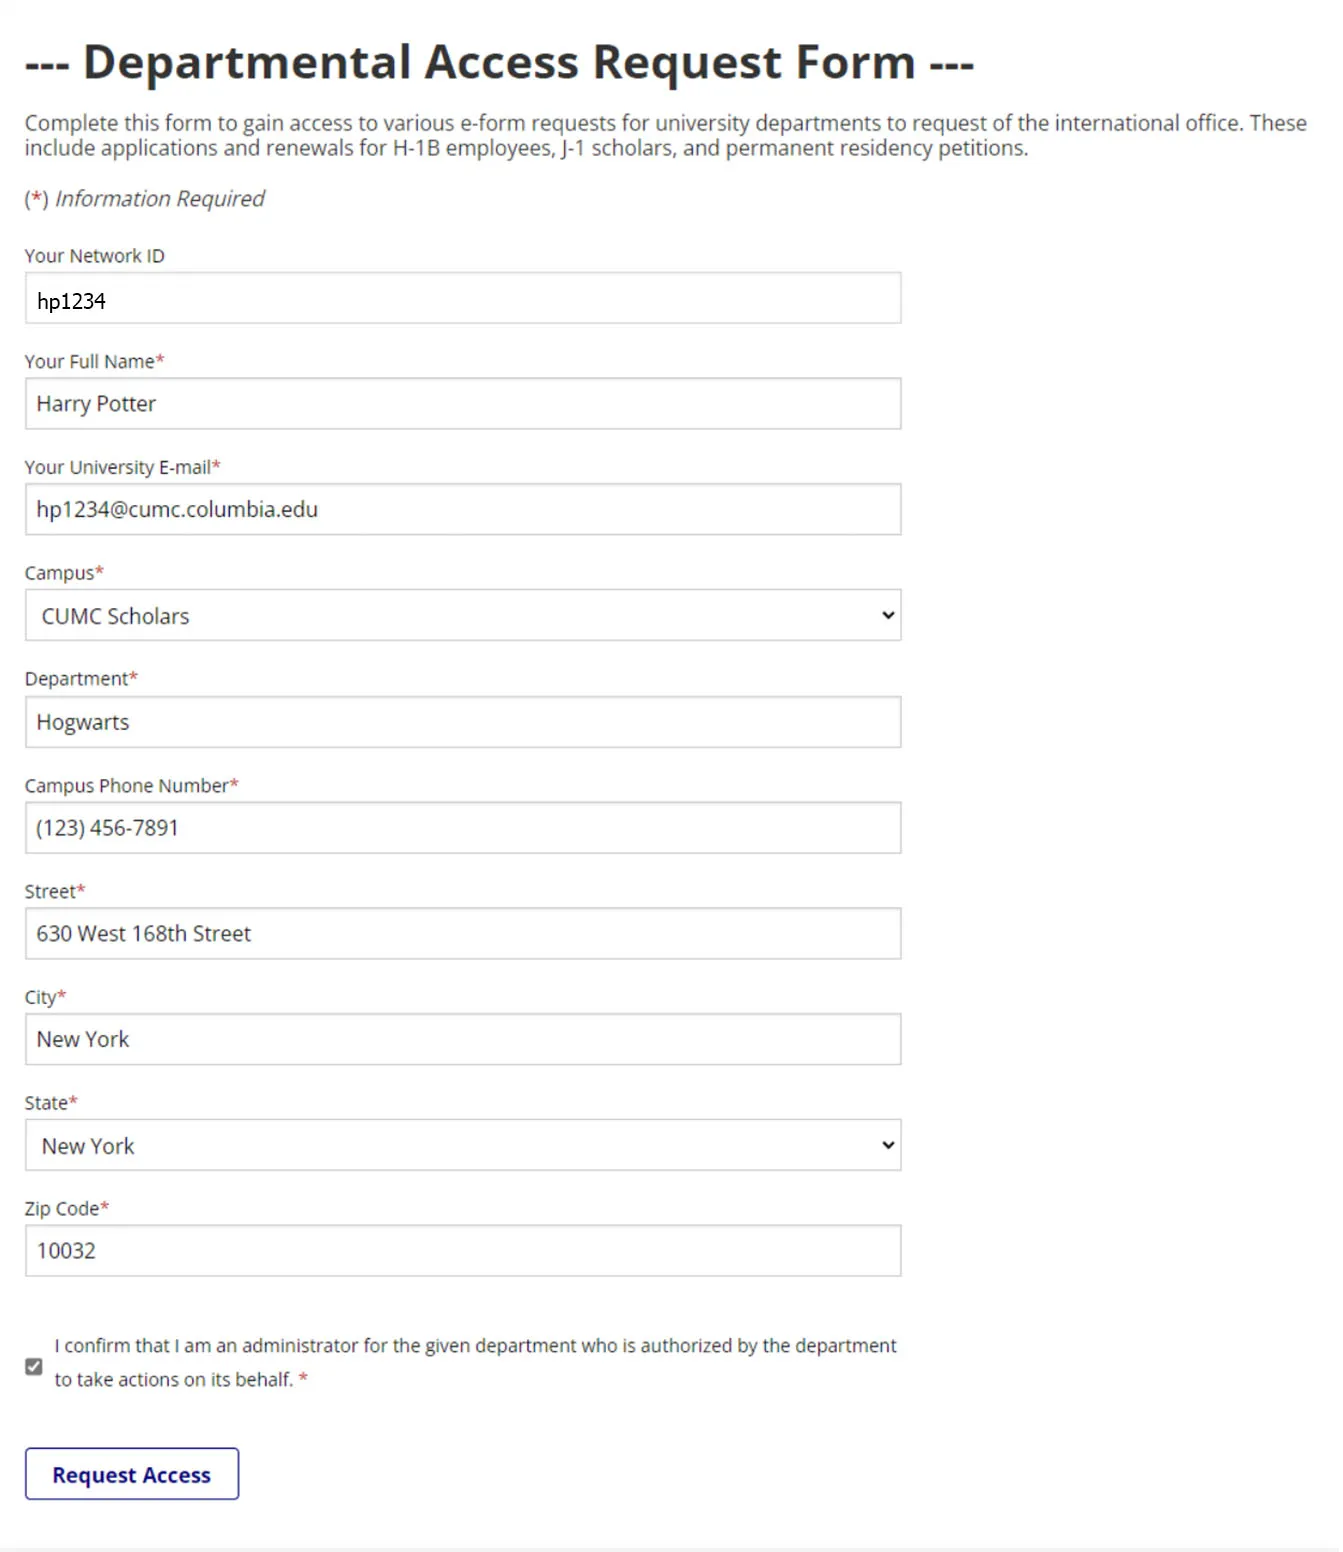
Enter all the information in the form. In the “Campus” field select “CUMC Scholars.” When the form is complete, click “Request Access” at the bottom of the form.
After submitting, the screen will look similar to the previous screen. You will know that the form has been submitted successfully if you see the words in the red circle at the top of the form.

How to Log in to Compass
Navigate to the main login page by using this link: https://compass.isso.columbia.edu.
These are the same credentials that you use when logging in to other Columbia University systems.
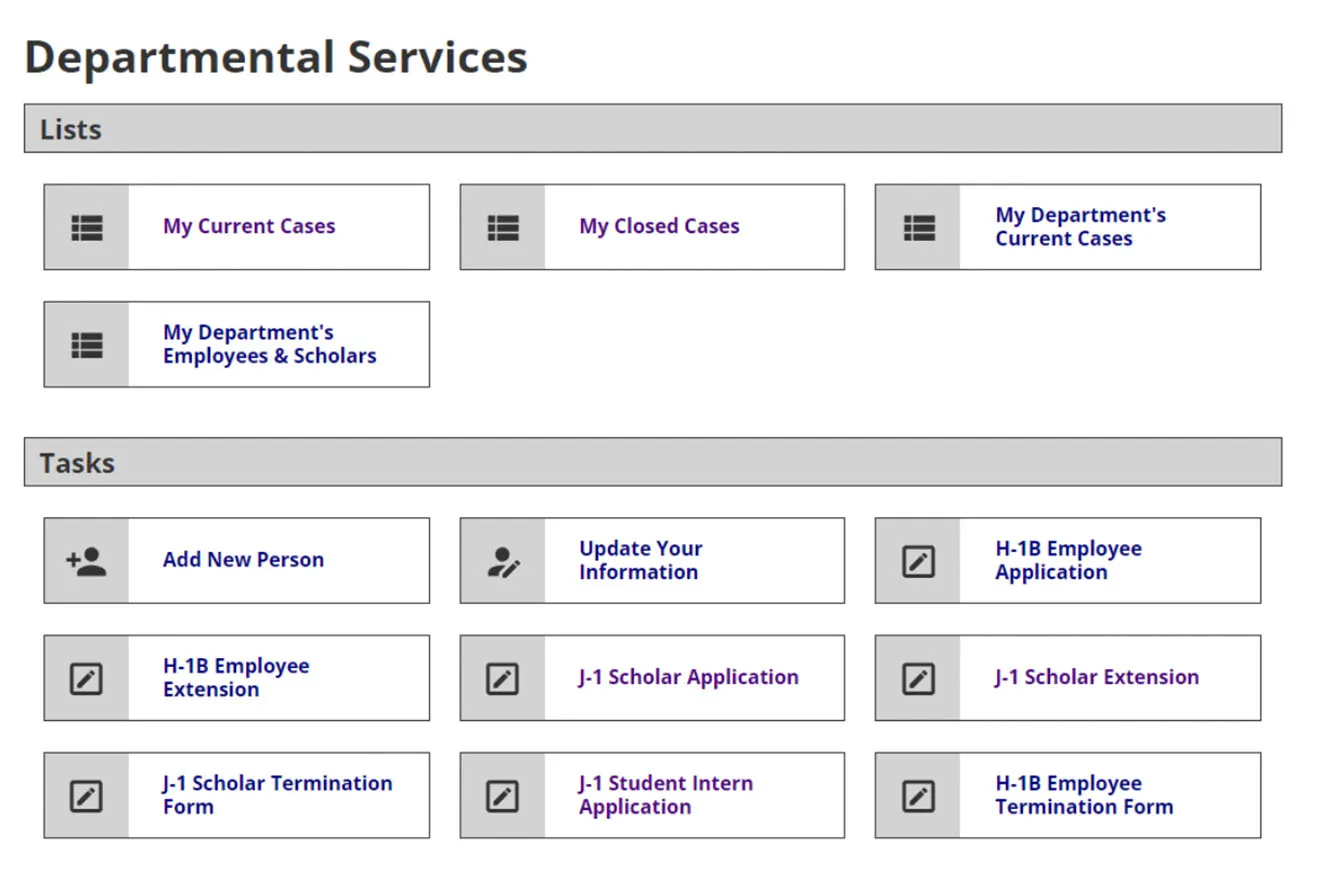
After logging in, the Compass home screen ("Departmental Services") will appear. On the home screen you will see tabs with menu options.
To view all your current cases click on "My Current Cases." To view your pass cases click on "My Closed Cases." If this is your first application there will be no cases displayed.
How to Submit an Initial J-1 Scholar Application
Process
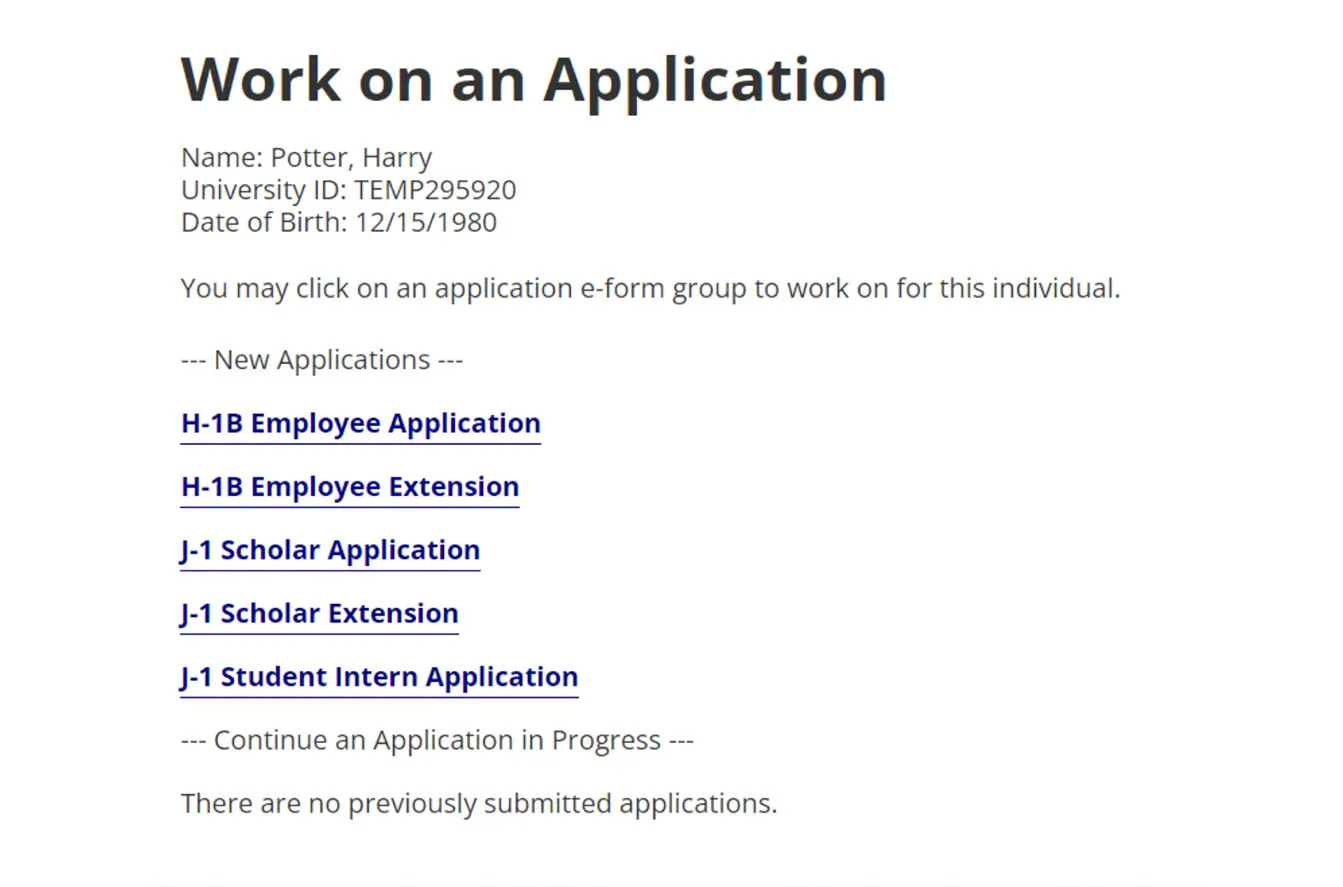
If the scholar has never been in a J-1 program at Columbia or is transferring their J-1 status from another institution, click on "Add New Person."
If the individual has ever been an affiliate of Columbia University, most likely they already have a Compass record and you do not need to add them as a new person. Please reach out to ISSO to request the Compass ID at [email protected]. Once you have the Compass ID from the ISSO, click on the application you would like to complete, enter the Compass ID and the date of birth. You can now skip to Step 3.
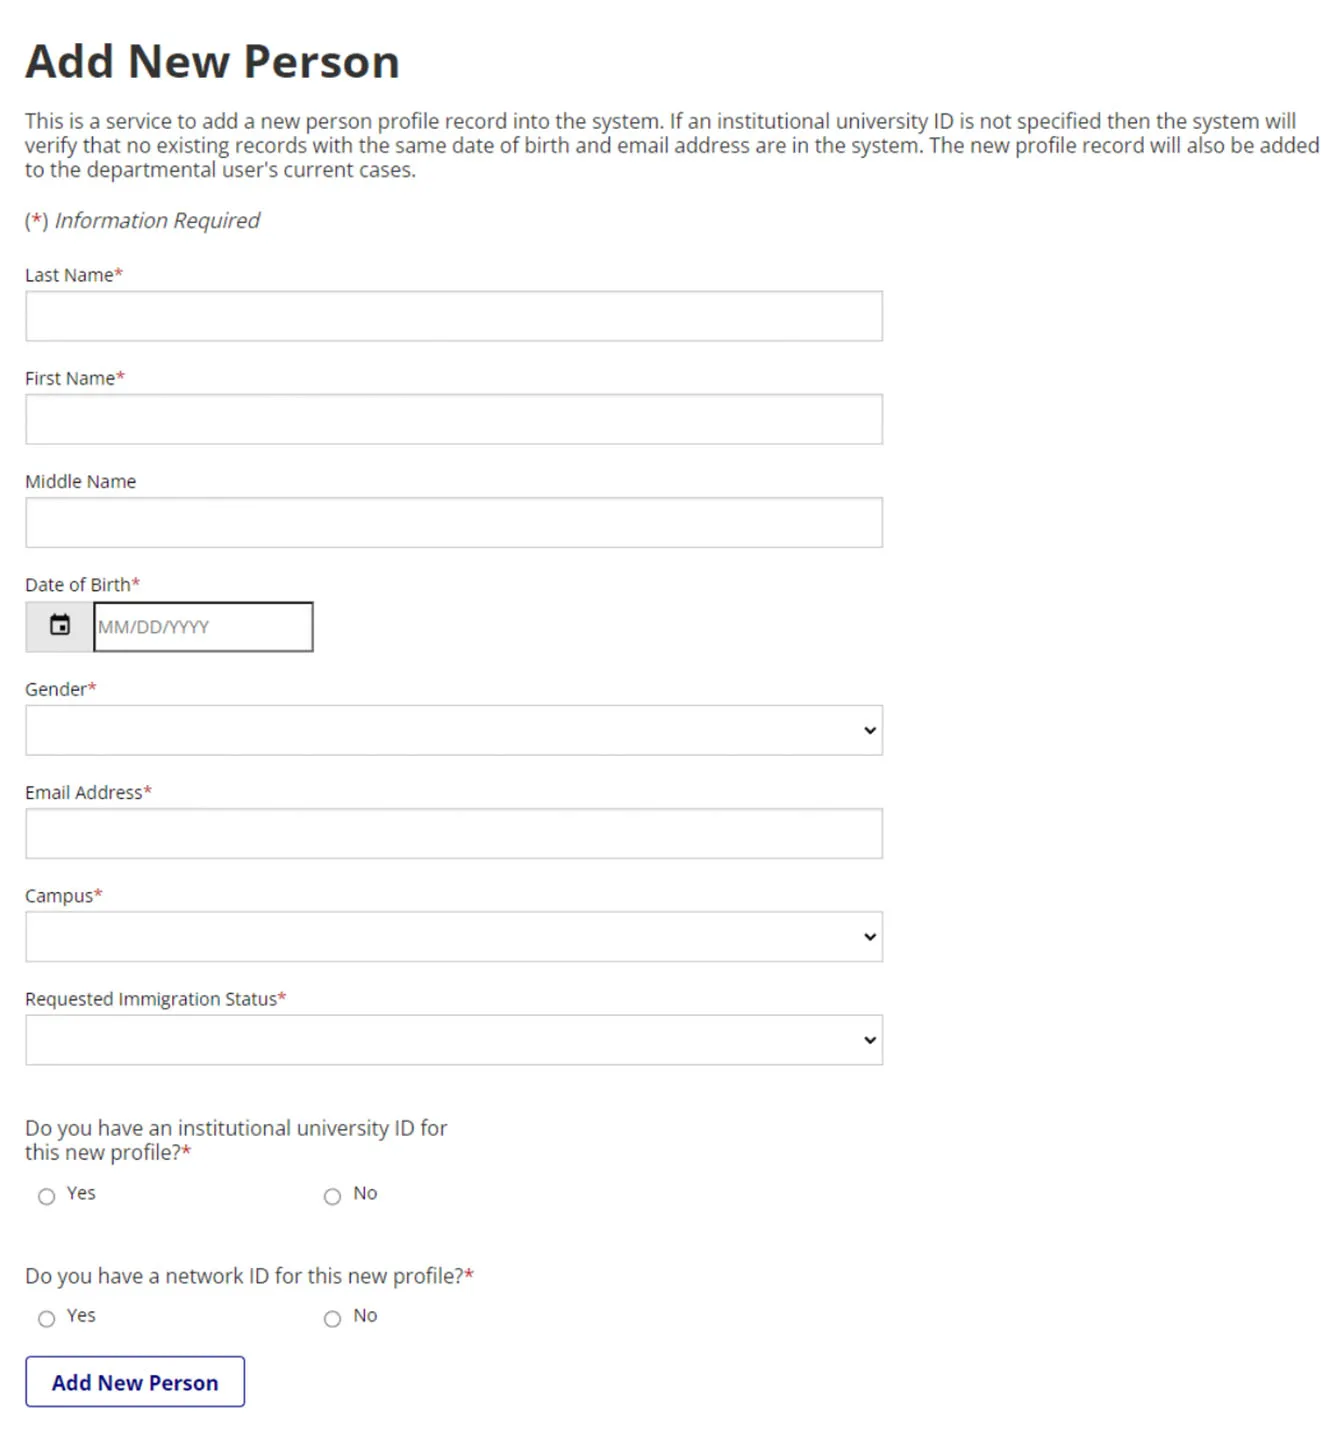
For Campus, please select "CUMC Scholars." For the last two questions, please select "No" since you are creating a new record in Compass. To save the profile, click "Add New Person."
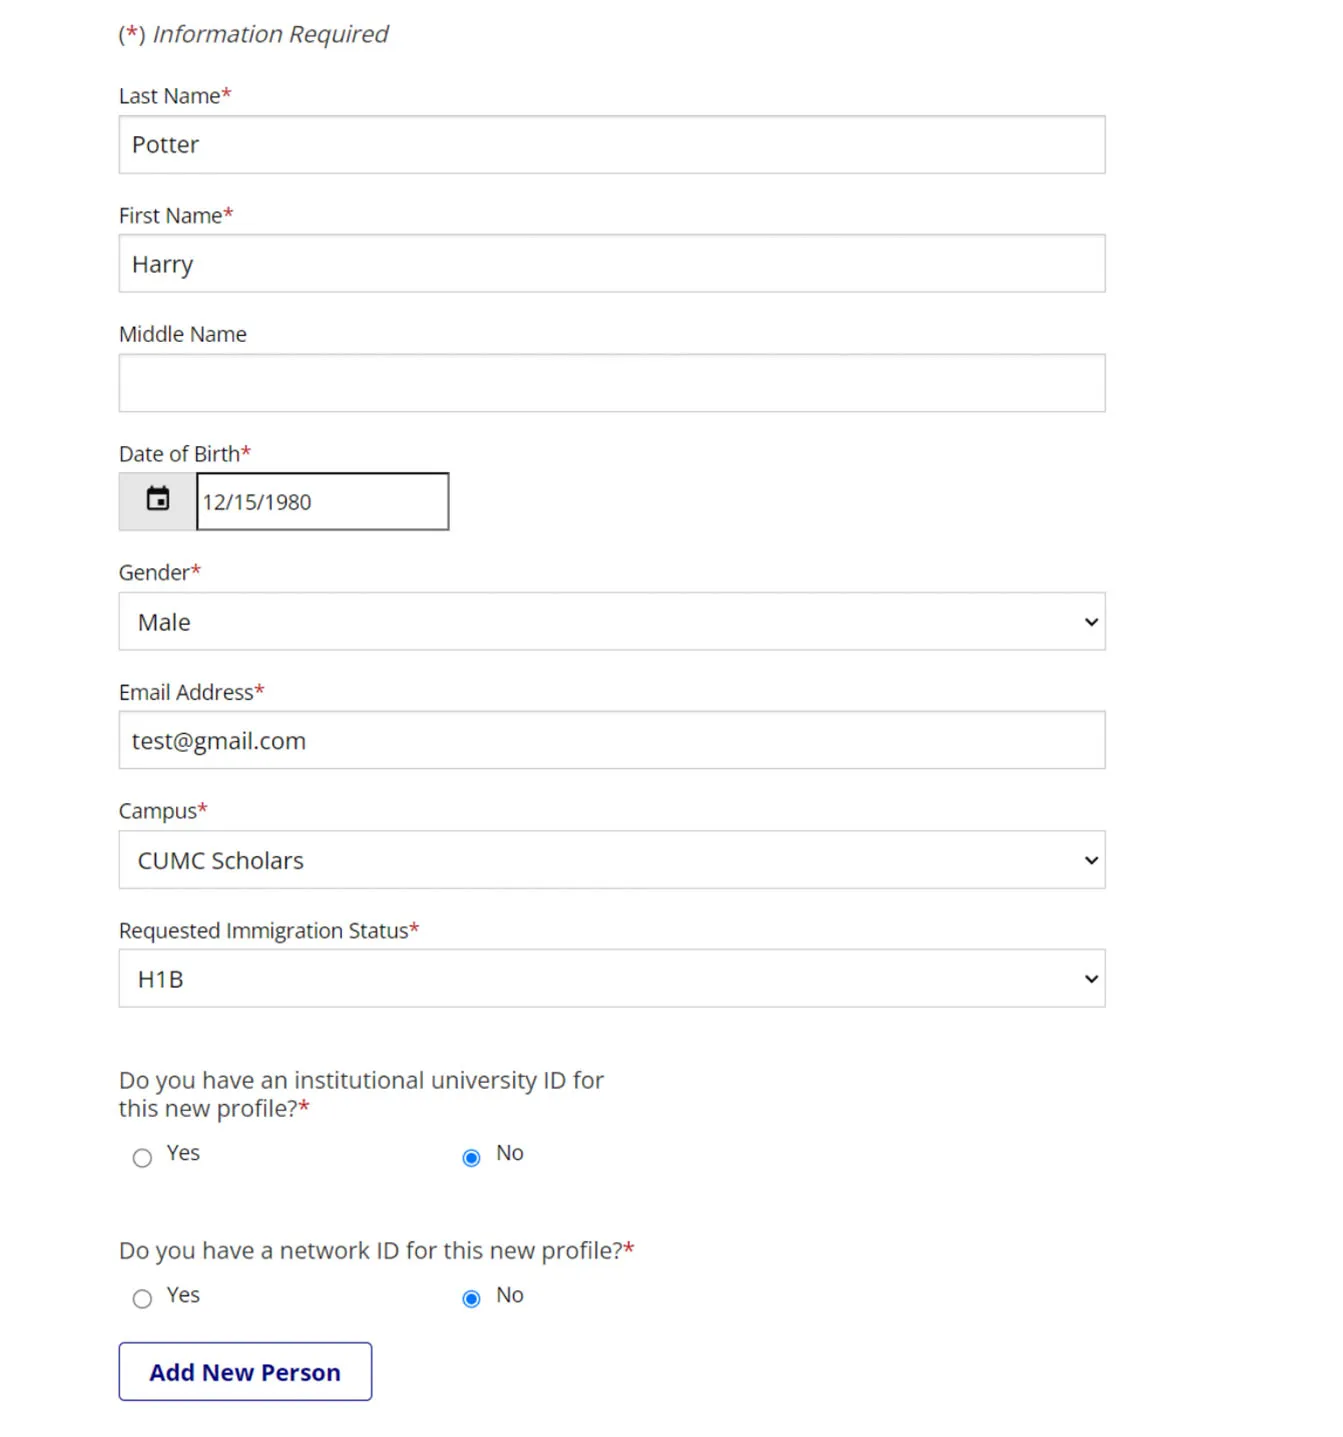
Once you have created this new profile, click on "J-1 Scholar Application" under the scholar’s name.
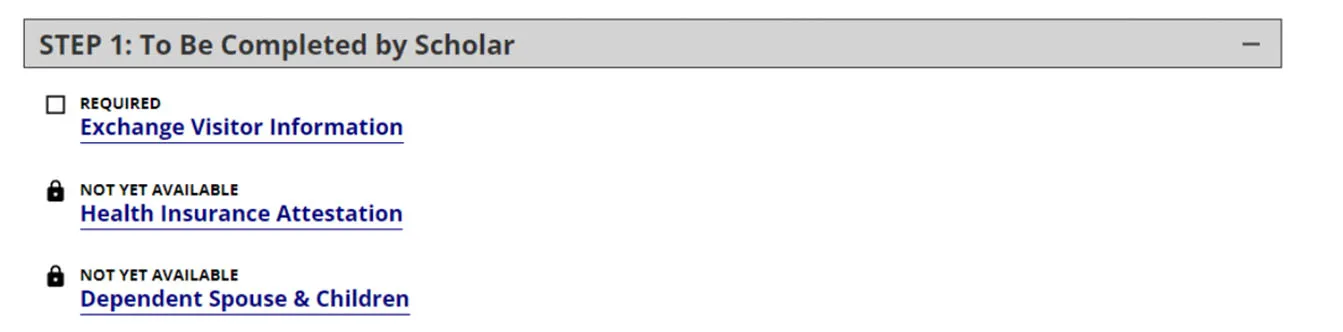
Under Step 1, you must click on "Exchange Visitor Information."
Then, at the top of the next screen click on "GIVE THE CLIENT ACCESS TO COMPLETE THIS SECTION."

On the next screen enter the scholar’s email address and click "Send E-mail."

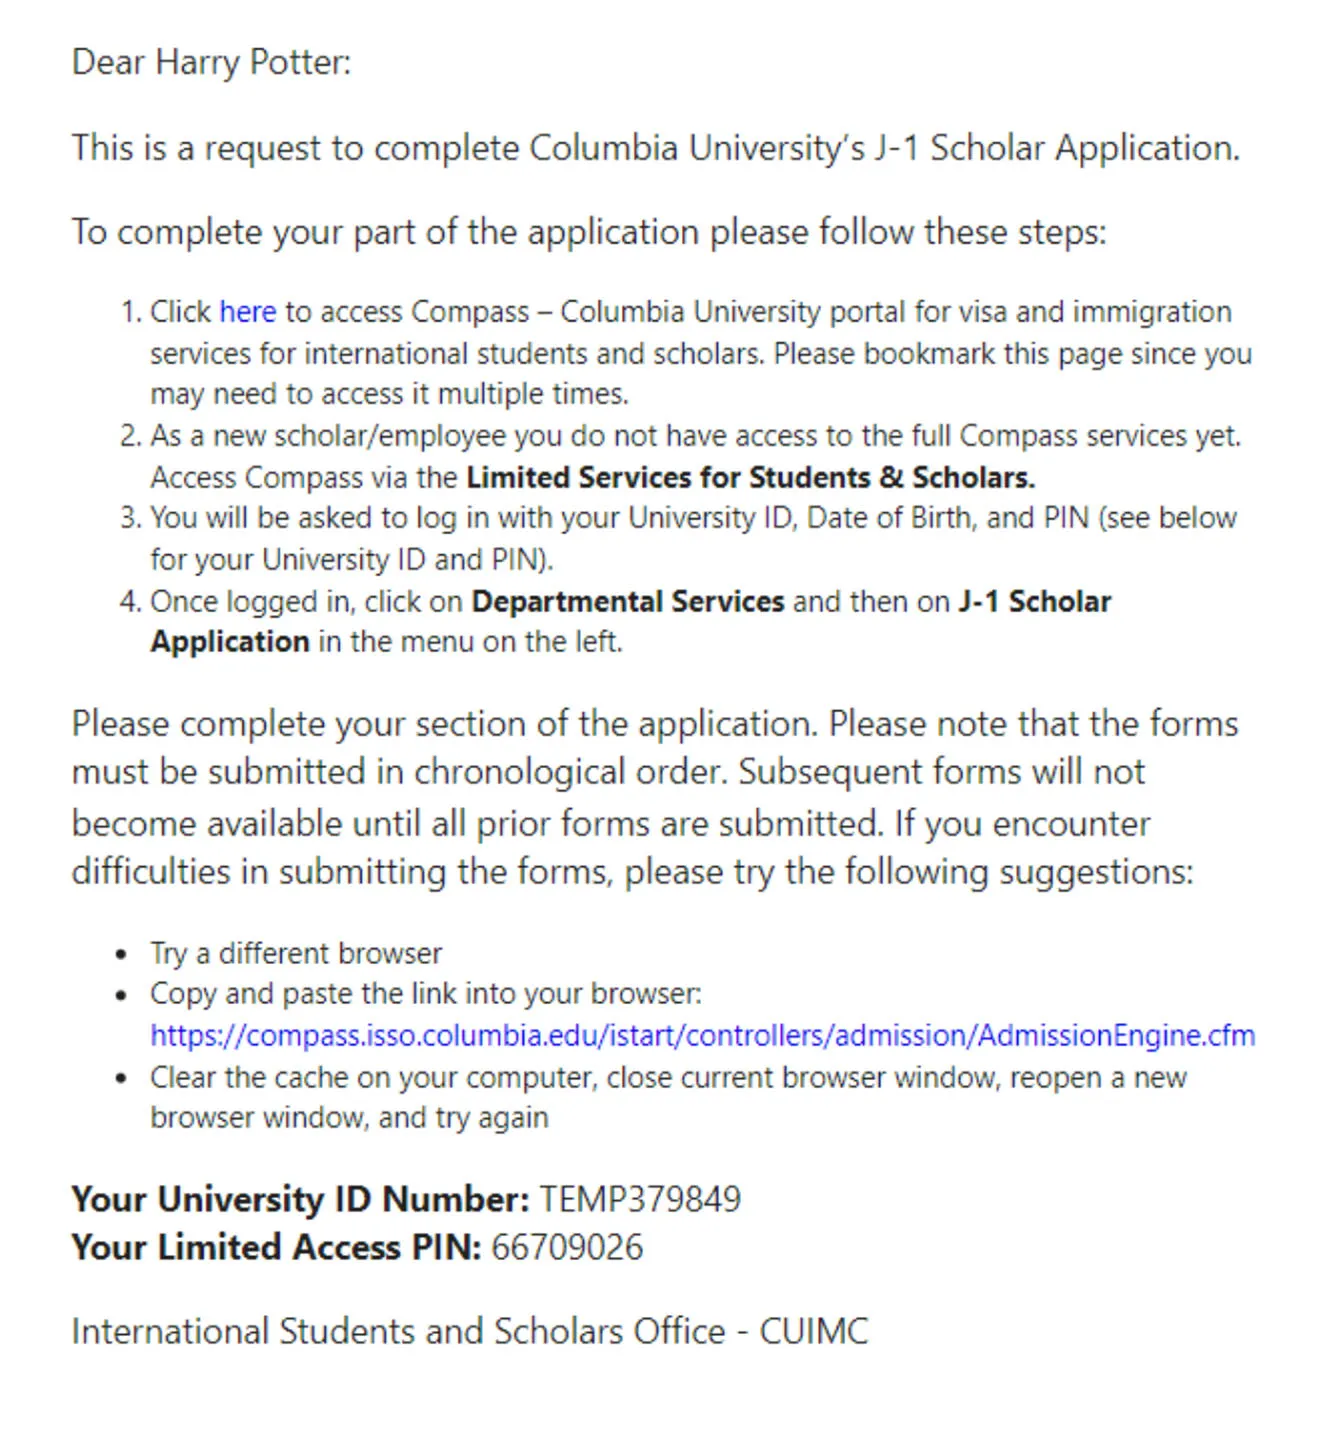
Now that you have given the scholar access to Compass the scholar will be able to complete Step 1. Although departments have access to the scholar forms, these forms must be completed by the scholar.
There are 3 forms within Step 1 that the scholar will need to complete:
- Exchange Visitor Information
- Health Insurance Attestation
- Dependent Spouse & Children
As the Departmental User who initiated the application you will receive an email confirmation once the scholar completes Step 1.
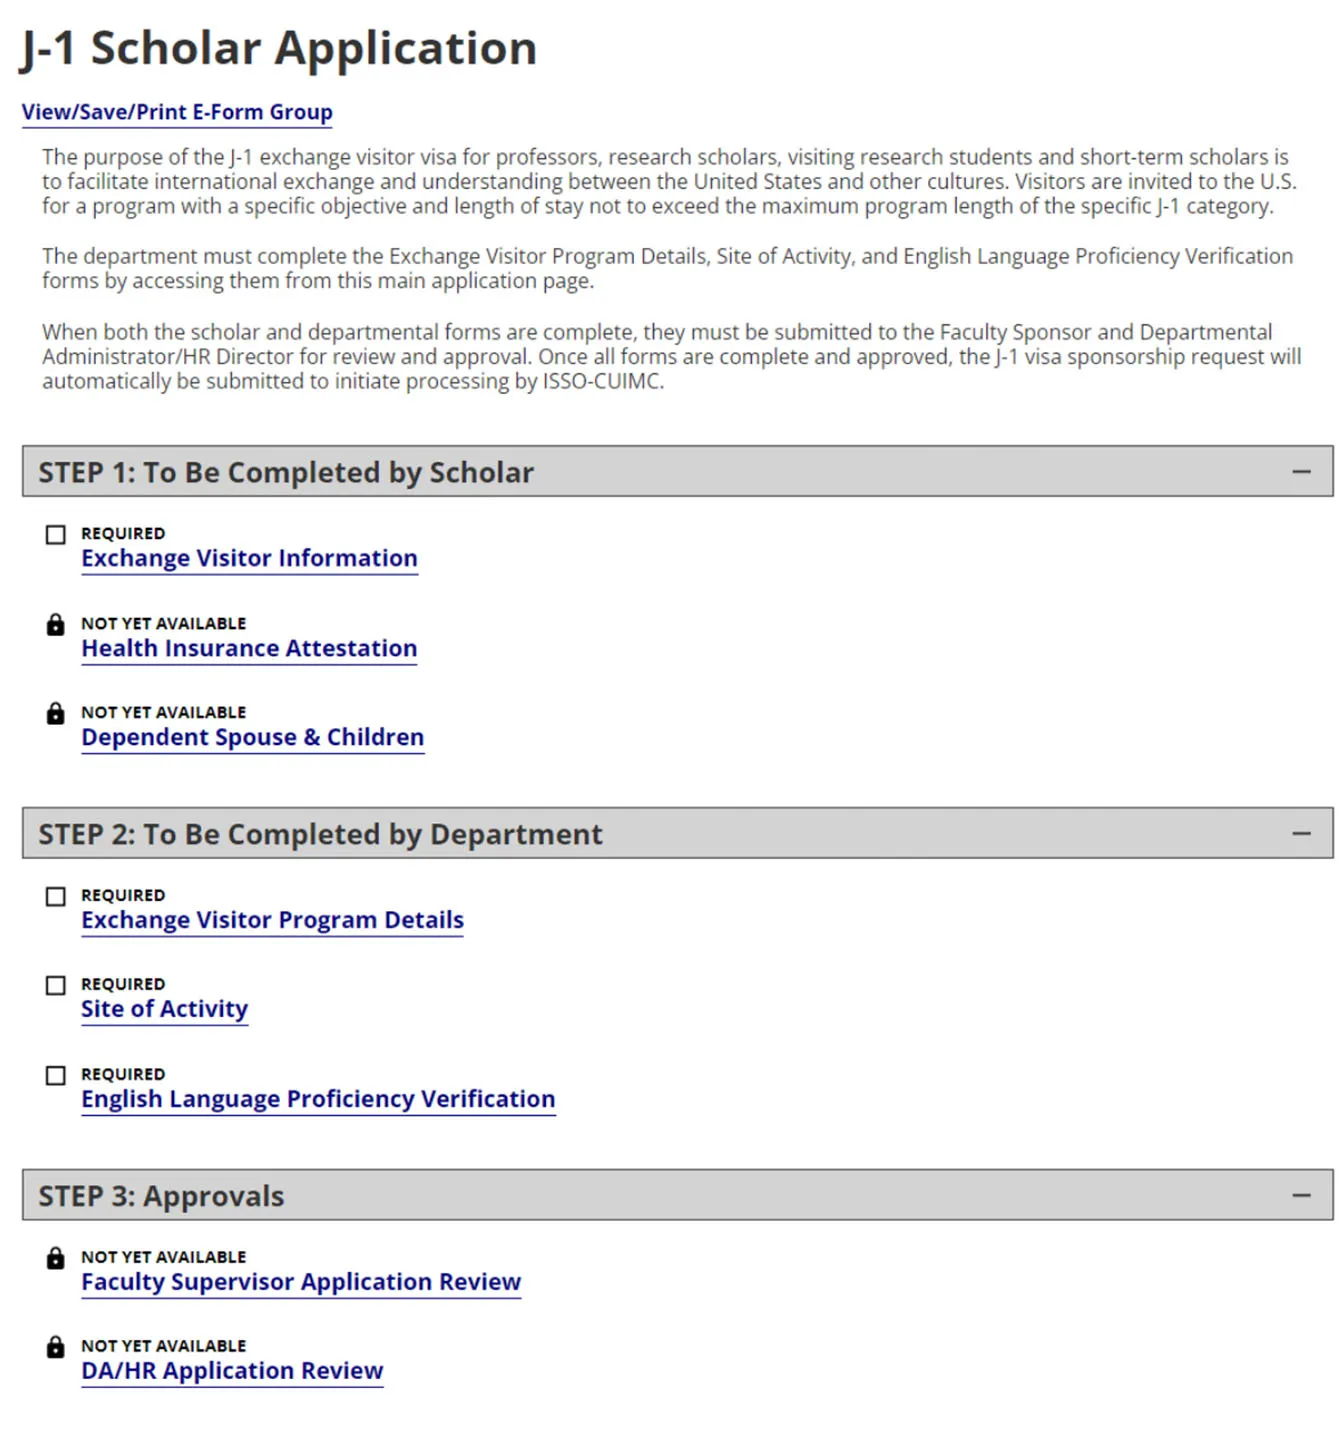
The Departmental User must complete the following forms:
- "Exchange Visitor Program Details"
- "Site of Activity"
- The "Site of Activity" Form can be submitted multiple times. You must submit a form for any off-site locations. If your scholar’s program will take place at locations other than CUIMC, please complete a separate "Site of Activity" Form for each off-site location.
- "English Language Proficiency Verification Form"
- The English Language Proficiency Verification form may require verification of a Second Approver.
Please note that once you send a request for approval to the Faculty Sponsor, the forms in Step 1 and Step 2 should not be changed. The application will not work otherwise.
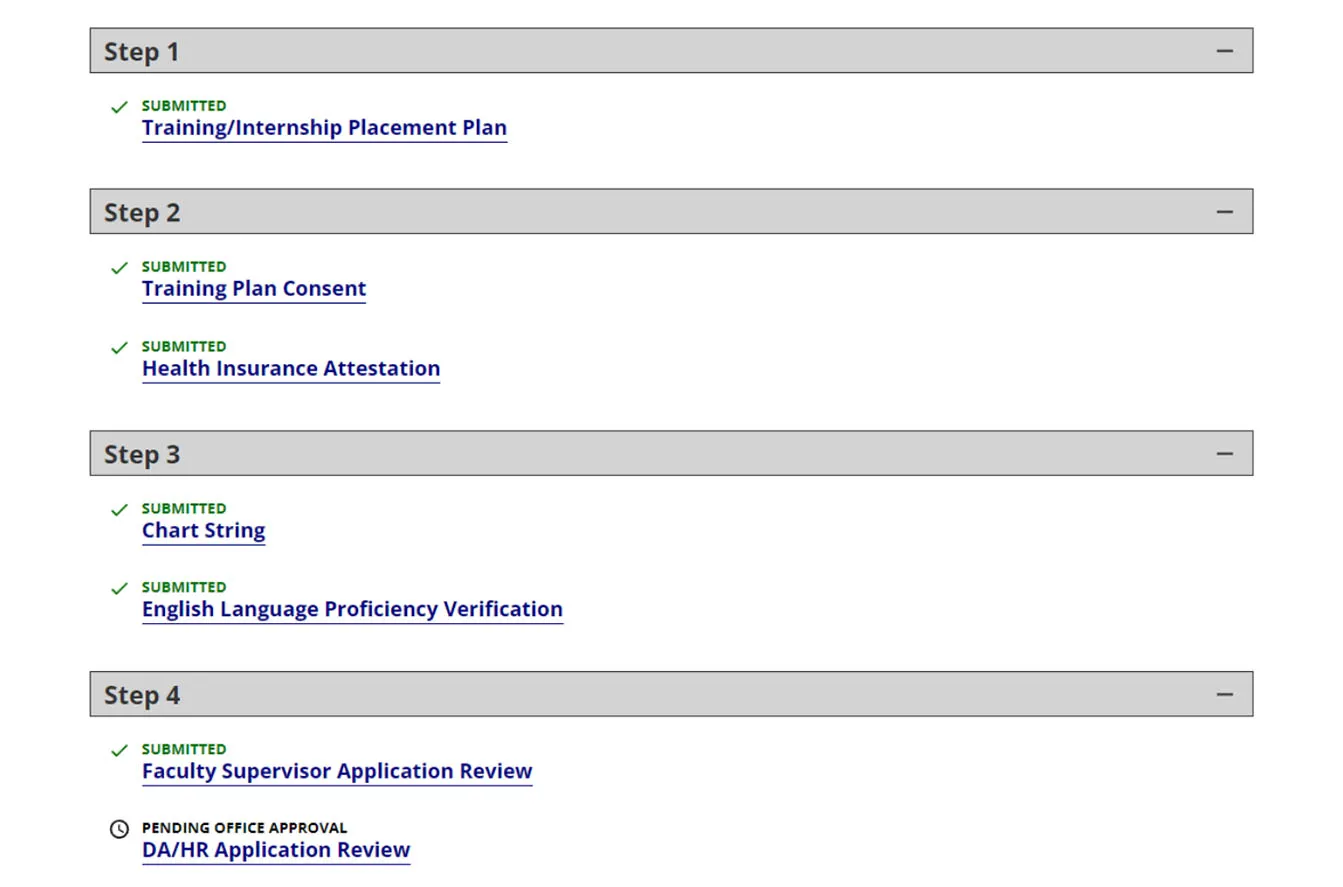
For each of these second approver forms, "Faculty Sponsor" "Application Review" and "DA/HR Application Review," the Departmental User will need to enter the email address for the faculty sponsor or the DA/HR approver. An email will be sent to the second approver with a link to the application for their review and approval. The forms will be marked as "Submitted" only after completed by the second approver. These forms are not available for submission (locked) until all prior forms have been submitted.
Once you send a request for approval to the Faculty Sponsor, do not change anything on the preceding forms because it will interfere with the processing of the application.
Once all forms are submitted and approved, all boxes within each step should have a check mark except the "DA/HR Application Review" form which will be in "Pending Office Approval" status. That means that the application has been submitted to ISSO and is pending our review.

How to Submit a J-1 Scholar Extension Application
If you are the Departmental User who created the initial profile for the scholar you are now extending, you can click on "Departmental Services" and select the scholar in the "My Current Cases/My Closed Cases list."
If the scholar’s visa (J-1, F-1, H-1B, etc.) is sponsored by Columbia University but you are not the Departmental User who created the initial profile for the scholar you are now extending or if the profile was created by the ISSO-CUIMC based on a paper application previously submitted, you will need to request the Compass ID from ISSO-CUIMC via email at [email protected].
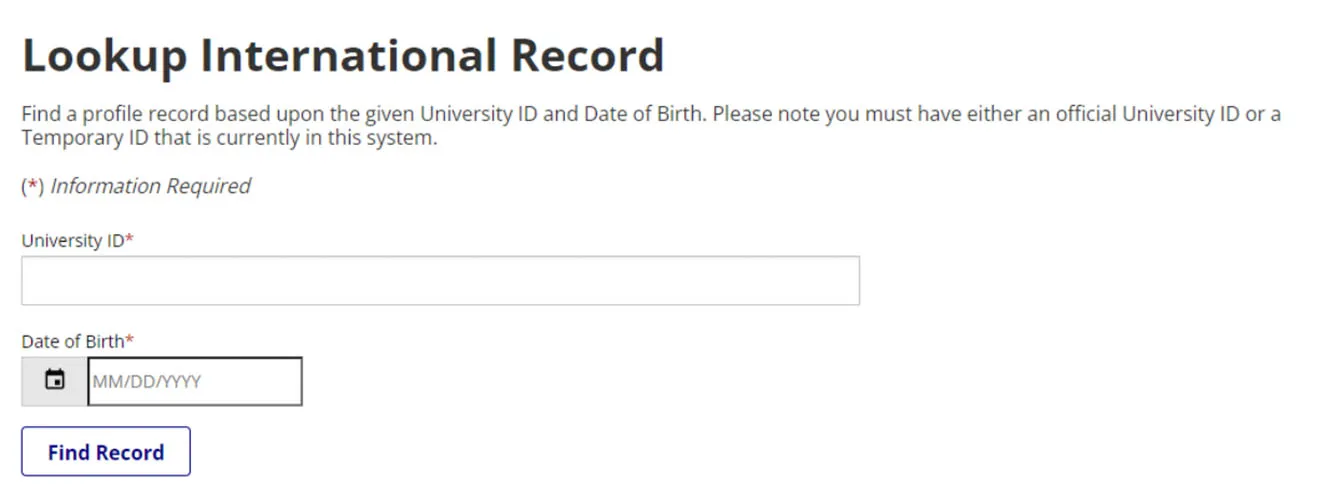
Once you obtain the Compass ID from ISSO-CUIMC, you can click on "J-1 Scholar Extension" and search for the scholar in the "Lookup International Record" by inputting their University ID and DOB.
An automatic email will be sent to the scholar with a link to this form. Once the scholar completes and submits the "Health Insurance Attestation" form you will receive an email notification.
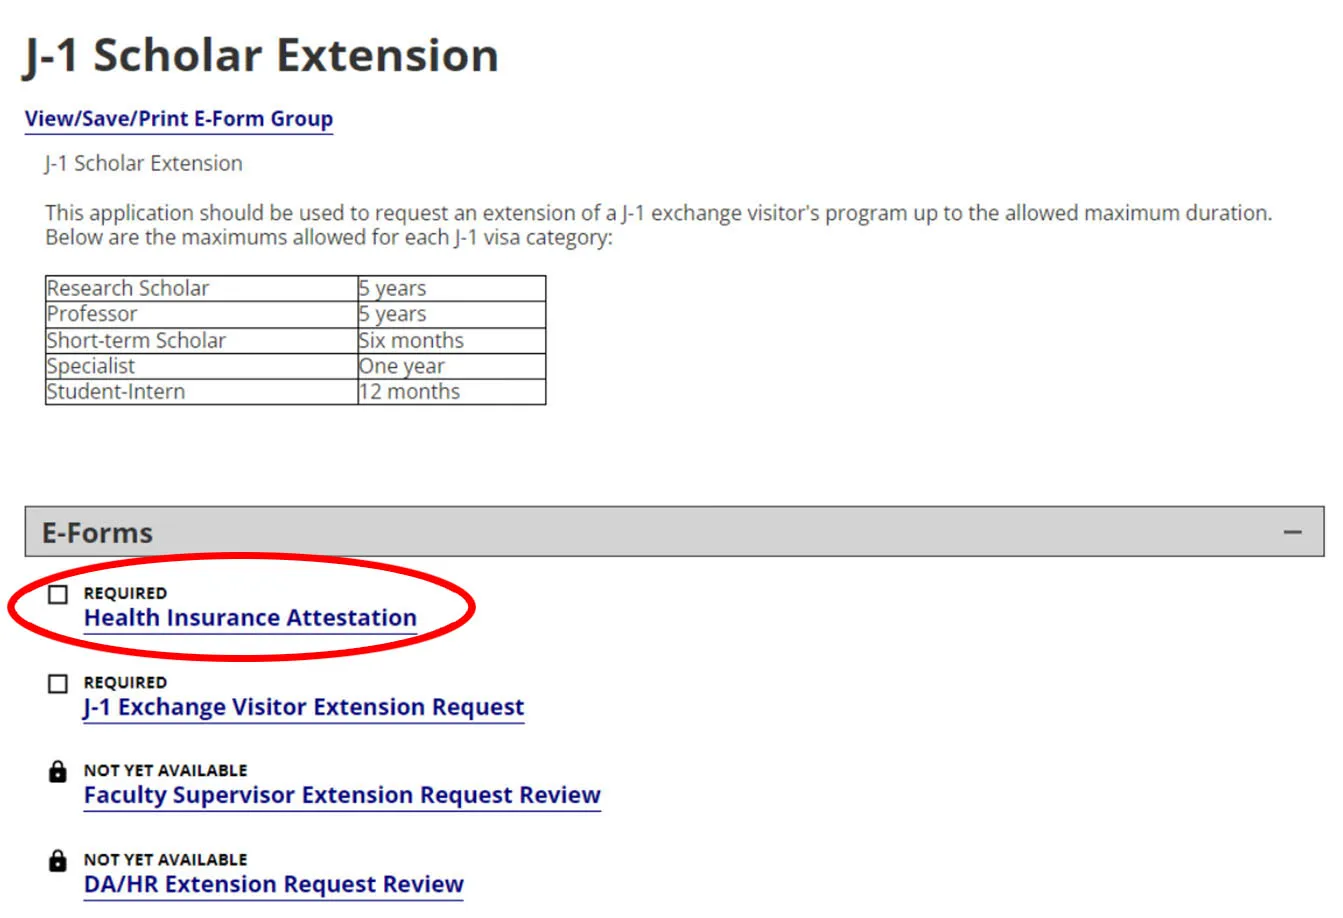
Click on the "J-1 Exchange Visitor Extension Request" link. Answer all questions and upload all required documents.
For each of these second approver forms, "Faculty Sponsor Application Review" and "DA/HR Application Review," the Departmental User will need to enter the email address for the faculty sponsor or the DA/HR approver. An email will be sent to the second approver with a link to the application for their review and approval. The forms will be marked as Submitted only after completed by the second approver. These forms are not available for submission (locked) until the prior forms, "Health Insurance Attestation" and the "J-1 Exchange Visitor Extension," have been submitted.
Please note that once you send a request for approval to the Faculty Sponsor, the preceding forms should not be changed. The application will not work otherwise.
This status means the application is pending ISSO-CUIMC review. Once the last form is submitted, the J-1 visa sponsorship request will be automatically submitted to ISSO-CUIMC for processing.
How to Submit a J-1 Student Intern Application
For "Campus," select "CUMC Scholars." For the last two questions, please select "No" since you are creating a new record in Compass. To save the profile, click "Add New Person."
After creating the new profile, click on "J-1 Student Intern Application" under the scholar's name.
Please review the eligibility and internship requirements on the next screen before proceeding.
Within the TIPP you will be requested to provide the email of the supervisor/faculty sponsor to complete their section. You will receive an email notification once they complete their section of the TIPP.
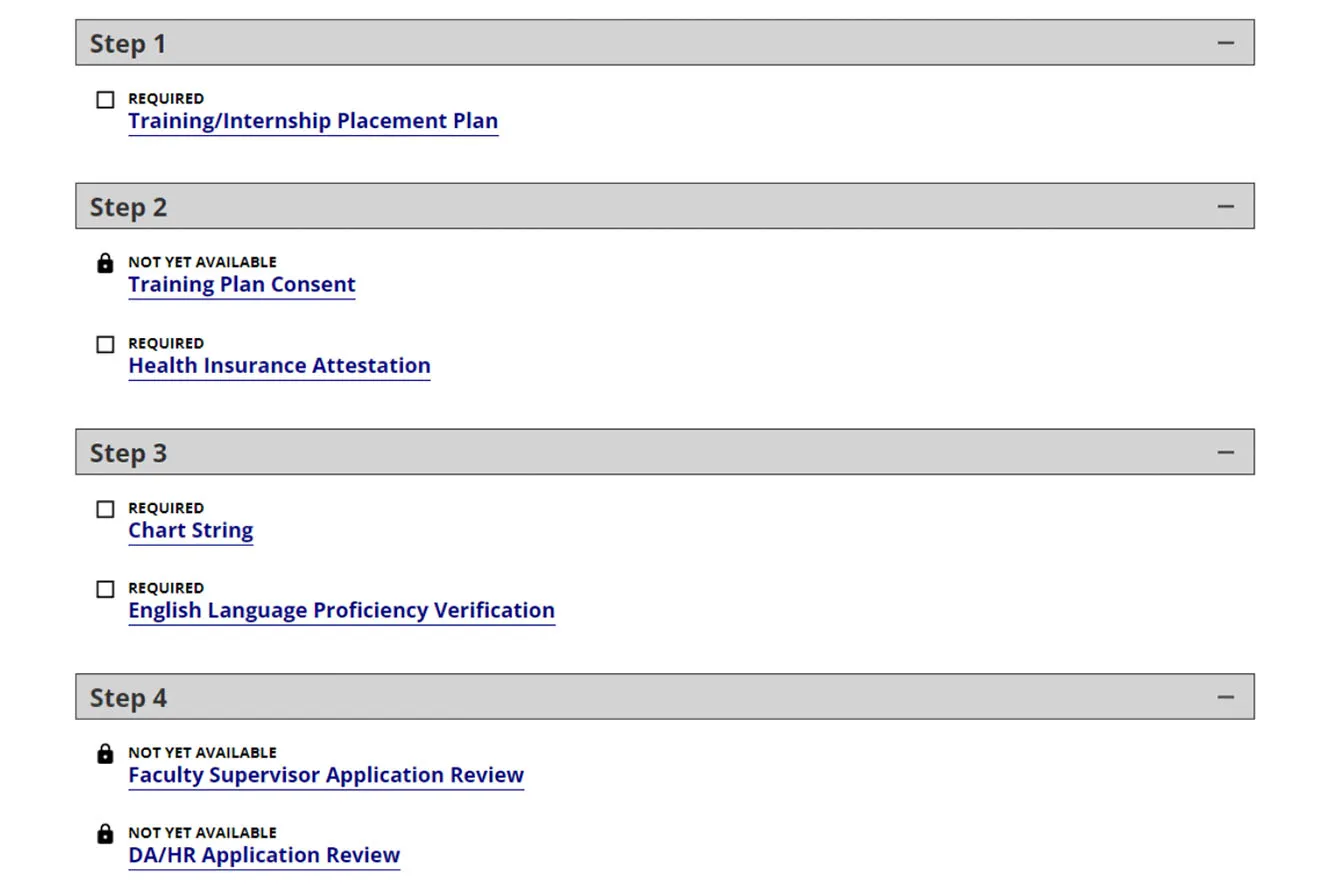
Click on the "Training Plan Consent" form and complete the form. Once you submit the form, an automatic email will be generated to the student intern with a request to review and approve the "Training/Internship Placement Plan." Once the Student Intern reviews and consents, the Departmental User will receive an email notification.
Enter the email address for the prospective Student Intern. An email will then be sent to the Student Intern with a link to complete this form.
The "English Language Proficiency Verification" form may require verification of a second approver.
For each of these second approver forms, "Faculty Sponsor Application Review" and "DA/HR Application Review," the Departmental User will need to enter the email address for the faculty sponsor or the DA/HR approver. An email will be sent to the second approver with a link to the application for their review and approval. The forms will be marked as "Submitted" only after completed by the second approver. These forms are not available for submission (locked) until all prior forms have been submitted.
Please note that once you send a request for approval to the Faculty Sponsor, the forms in Steps 1, 2, and 3 should not be changed. The application will not work otherwise.
This status means the application is pending ISSO-CUIMC approval. Once the last form in the application is submitted, the J-1 visa sponsorship request will be automatically submitted to ISSO-CUIMC for processing.